Showing posts with label technique. Show all posts

October 1, 2007

Starflower chart

Things are busy around here. I'm trying to finish up a few things all at once. The Dancer's Wrap sweater is finished, but still needs to be washed and blocked. I finished a pair of little socks for D in his favorite color-orange. But E's Halloween costume has taken up the most of my time. She's going to be a fairy. The wings are painted and finished drying. Now it's time to work on her outfit. I'm not sewing a dress, but I'm throwing a few fairy looking things together.

Enough of that, lets get to the chart. I wasn't sure how to write out a sock pattern. I'm pretty set in my ways about socks and I'm sure other toes or heels would work with this pattern. Keep in mind that this stitch pattern pulls in. I normally knit my socks 68 stitches around in plain stockinette, but I used 72 stitches around for this socks.

Yarn: any fingering weight-the yarn used here is Yarntini's Fig and Plum
Needles: size 0 (2mm)
Gauge: 8.5 stitches an inch

I use a Turkish cast-on (another good tutorial) with 12 wraps around the needles. I increase 4 stitches on every row until there are 40 total stitches. After that, I increase 4 stitches every other row until there are 72 total stitches. Knit two stitches, knit 4 repeats of the chart, knit two stitches, and then knit across the bottom of the sock.
star flower chart
star flower key*Edited to add: For the 2nd symbol, you hold the cable needle to the front.

Knit that section until the sock is around 1.5 inches shorter than your total foot length. Knit a short row heel. I don't exactly use this method, but this tutorial is excellent.

Then move two stitches from either side of the instep to the back of the sock. I use safety pins to hold them while transferring. Then you can knit the stitch pattern 4 times across the front of the sock and 5 times across the back. Continue until the sock height is to your liking. Then knit in 1x1 ribbing for at least one inch. Cast-off very loosely and weave in the ends.

Notes:

For a smaller sock, you can increase until you have 64 total stitches. Then you can knit 4 repeats on the instep and 4 repeats on the back without having to move stitches around.

I cabled without a cable needle, but it's much easier to write out directions with the cable needle.

September 15, 2007

SOS #35 and #36 plus almost matchy stripes

91407c 91507c

First, here are the next two completed socks. On the left is Vesper in Venus in Furs knit in plain stockinette. On the right is Perchance to Knit in Sophisticated knit in the Bellatrix(pdf) pattern. The details for both socks will be at the end of this entry.

Second, I said that I would describe how I make my self striping socks match. The very first thing is that you need to make sure that you're starting both socks in the same place.

I start with a slip knot right where the stripes change from one color to the next. Here, I did it where the purple ended and the pink began. I use a Turkish cast-on. I tried taking pictures, but really the best thing would be to follow FluffyKnitterDeb's great instructions. She explains it thoroughly and has plenty of pictures. That is where I learned how to do the Turkish cast-on and I've been using for all of my toe-up socks (except for the Coriolis).

From previously knit Vesper socks I knew that if I used size 0 (2mm) needles and 68 stitches around, my short row heels would take approximately three different colored stripes. If I wanted the heel to have a mitered look and the foot to have an uninterrupted stripe pattern, I needed to start the short row heel in the middle of one of the colors. It takes me around 5-6 rows for each color, so I started the heel after knitting 2.5 rounds of purple. Below, I'm ready to start the heel.

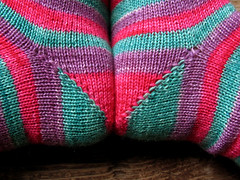
91407bUnfortunately, my heels didn't line up perfectly in these socks. I should have knit across this side and started the heel on the other needle. This is what happens when you start the heel about a half of a round or a round too soon. Sure one sides looks decent, but the other side of the sock looks way off. This technique worked perfectly for my Aqua Melon socks.
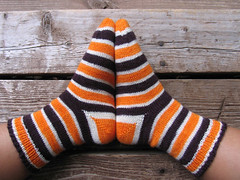
91007gYou can try to figure out how to make perfect mitered heels with other types of self striping yarn. I figured that if I had 34 stitches on one side of the sock(half of the total stitches) and if I left 12 stitches unwrapped in the center of my heel, that would mean that I would have 34-12=22 wrapped stitches. Since you wrap one stitch on each row, I would be knitting 22 rows. Now, we know that the rows get shorter and shorter, so I took 22 and divided it in half and got 11. From that, I guessed that I would need around 11 stockinette rows to knit the heel. Counting the rows on the foot portion of this sock, I found that the orange or black stripes were 7 rows long and the white stripes were around 2.5 rows long. For this heel, I would need two sections of white and one orange or black to complete the short row section. And it did!! Sure the miter isn't completely perfect, but it's so close. On the Trick or Treat socks, I started the heel where the black ended and the short rows were done in one white section, one orange section, and another white section.

I hope that's making sense. ;-) It works for me.

Details for the Vesper socks:
Yarn: Vesper sock yarn in Venus in Furs
Needle: size 0 (2mm) Addi Turbo
Method: magic loop, two at once, toe-up, Turkish cast-on, short row heel
Pattern: plain stockinette
Start: September 12, 2007
Finish: September 14, 2007

Details for the Perchance to Knit socks:
Yarn: Perchance to Knit in Sophisticated
Needle: size 0 (2mm) Addi Turbo
Method: magic loop, two at once, toe up with Turkish cast-on, short row heel
Pattern: Bellatrix
Start: September 14, 2007
Finish: September 15, 2007

I knit the Bellatrix socks toe-up and used the same needle for the whole sock. I found the pattern to be incredibly stretchy--almost too stretchy. I knit the socks to my preferred length where the leg portion is equal to the foot portion when you fold the sock in half. This pattern is better suited to being a knee sock or something higher. The stitch pattern has a tendency to slouch. I don't mind it though because that emphasizes the yarn over sections and I like that texture.

Up next, socks in a pattern that I'm made up with slipped stitches. I like the effect slipped stitches has on variegated yarn.

August 18, 2007

How to modify stitch patterns for your socks

I think that I've lost my sock momentum. I just frogged yet another pair of socks. Well, not whole socks, but the toe and a few pattern repeats. That takes the sock attempts that have been frogged to 4. Ugh. I have started another one. This time, I flipped through my Barbara Walker Treasuries and picked out a few stitch patterns. We'll see if any of those look good on a pair of socks.

I've had a few questions asking me how I modified the Baby Fern pattern in socks #18 and #19. To answer how I modified the pattern, I tackled formatting in excel and drew up a few charts. Please note that these were not taken from any book. I just started putting increases and decreases in a "v" type pattern that usually looks good on socks. I don't know if they would even look good on a pair of socks, but feel free to try it out.

Okay, lets say we have the stitch pattern below. It's only 10 stitches wide. That's great if we want to knit a sock that is 60 or 80 stitches around. For me, I could knit a 60 stitch sock with sport weight yarn and 2.25mm needles. The symbol in the center of the chart is a centered double decrease or slip two together, knit one, pass the two slipped stitches over.


I have added 2 rows and two columns in the chart below to the original stitch pattern. Now this makes it a 12 stitch repeat. This would be good if you want to knit a 72 stitch sock. For me, I could knit this with fingering weight yarn and 2mm needles.


But let's say that I want to knit a sock that's 64 stitches around. I can add 6 rows and 6 columns to the original stitch pattern. This one would make the increases and decreases more exaggerated and will most likely make a zigzag with self striping yarn.


If you want to see another stitch pattern that has been altered, click the pictures below. I used the same method of adding rows and columns as the example shown above. The symbols are knit two together on the right of the yarn overs and slip-slip-knit on the left.


10 stitch repeat


12 stitch repeat


16 stitch repeat


Edited:
I knew that I missed posting something important. I used the Aire River Design Knitting Font to create these charts. I've barely used Excel, but I did figure out how to configure my cells to a decent size. There's probably an easier way, but I haven't found it yet. ;-) Here are the steps to get the cells formatted like those above.
  1. Highlight many, many cells. Many more than you think you need.
  2. Go to Format -> Cells. From that menu, pick the knitting font, bold, and size 14 font.
  3. Go to Format -> Row -> Height and enter 12.
  4. Go to Format -> Column -> Width and enter 3.
  5. Use the helpful gif that comes with the font to find the ones you need.
  6. After charting out the stitch pattern, highlight it, and pick the little box that's to the left of the paint bucket. I picked the one that outlines the whole selection.
I hope this helps. I've never used Excel for anything before. Ours is an old version, so if you have newer software, things might be found in different places.

August 11, 2007

Sewing down a picot edge

This is how I finished off the picot edge on the toe up socks in the previous entry. I tried plain sewing and didn't like how the stitches ended up twisted. In an attempt to sew them down flat and keep the stretchiness, I came up with this. It's sort of like the kitchener stitch in that you're sewing through the live stitches twice. That is what makes them lay flat. Here we go...

Click pictures to see a slightly larger version.

Cut the yarn and leave a really long tail for sewing down the free stitches.

Insert the sewing needle into the first stitch purl-wise and keep the yarn underneath the knitting needle. Keep that stitch on the knitting needle.

Hold the sewing needle pointing towards the picot edge. Insert the sewing needle under a purl bump and pull the yarn through. Keep all yarn underneath the knitting needle.


Insert sewing needle knit wise into the first stitch on the knitting needle. Keep yarn underneath the knitting needle. Pull that stitch off of the needle.


You can see how it looks a bit loose in the picture below. I tighten this up before starting the next stitch.


This is what the finished section looks like. The live stitches are are dark grey. The purl bumps are pink. The yarn that I was sewing with is white.